The most flattering cut does not hide a round face or disguise fine strands—it gives both a clearer, more confident shape.
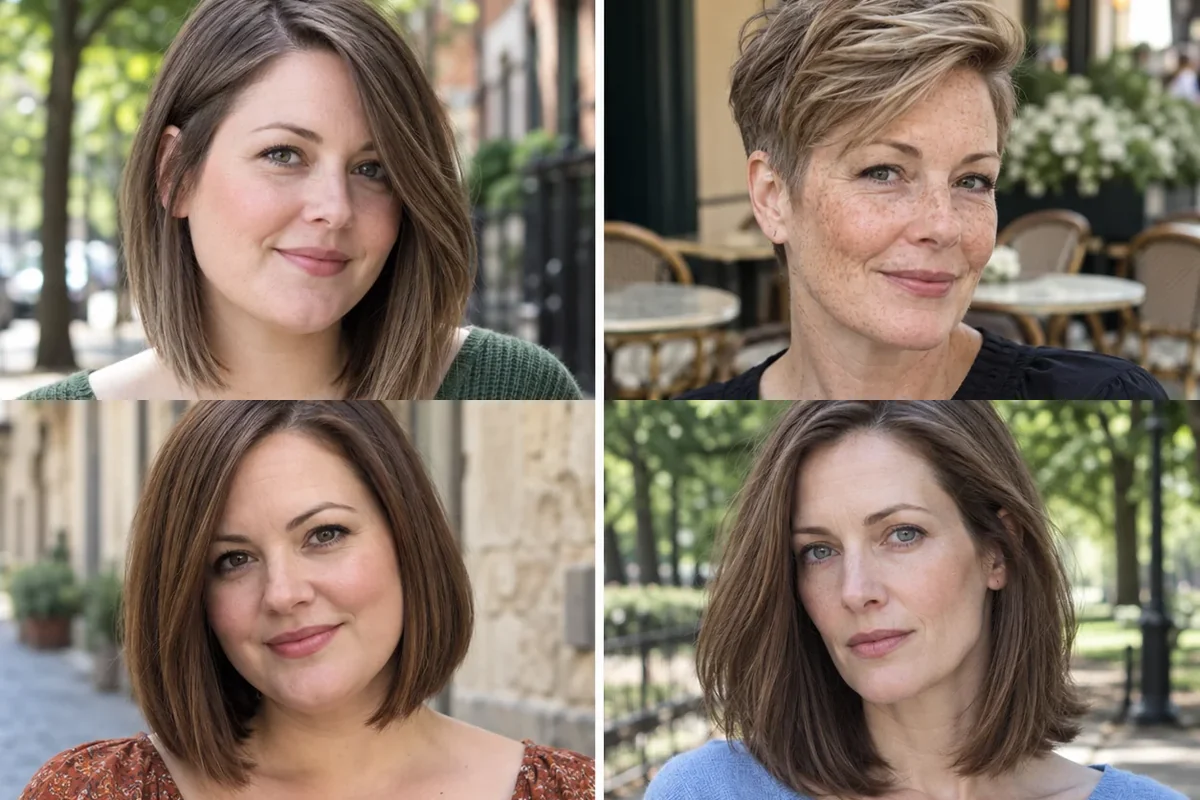
Hairstyles for round faces and thin hair work best when they create vertical or diagonal movement while keeping the ends substantial. Signature details include lifted crowns, off-center parts, below-cheek framing and clean perimeters. That differs from adding many layers, which can expose sparse ends, or placing maximum width at the cheeks. The goal is balanced proportion and believable density, not rigid face-shape rules.
Find the one that feels like you: Start with the first look and let the photographs lead. Each style explains how the shape affects your features, the mood it creates and the exact words to take to your stylist.
Quick Facts
- Protect the perimeter and layer only where lift is useful.
- Off-center parts create an easy diagonal.
- Place framing above or below the widest cheek area.
- Light root lift matters more than curling every end.
1. Angled Collarbone Lob With a Deep Side Part

This collarbone lob sits slightly longer in front, so its diagonal pulls the eye downward while the deep side part adds instant crown lift. The solid baseline makes thin hair appear denser, and the asymmetric sweep softens full cheeks without covering the face. It feels polished and quietly confident while still fitting into a low ponytail. Ask for a collarbone lob with a subtle forward angle, no thinning at the ends and framing below the cheekbones; dry the roots against the part, flip them back and finish with flexible spray.
Ask your stylist for: Ask for a collarbone lob with a subtle forward angle, solid perimeter and framing below the cheekbones.
2. Soft Pixie With a High Side Sweep
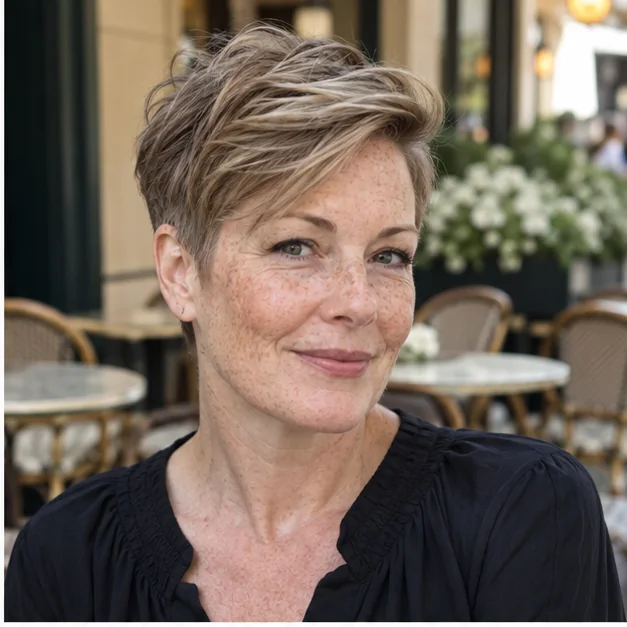
A softly tapered pixie keeps the sides close without looking severe, then leaves a longer top that sweeps upward and across the forehead. That controlled height lengthens a round face, while the intact top layer prevents fine hair from becoming transparent. The result feels bright, modern and feminine, especially when you want the eyes to lead. Request scissor-cut tapered sides, three inches on top and a substantial side-swept front with no razor thinning; work a pea-size volumizing paste through dry roots and expect trims every five to seven weeks.
Ask your stylist for: Request softly tapered sides, three inches on top and a full side-swept front without razor thinning.
3. Blunt Below-Chin Bob With an Off-Center Part

Ending below the chin keeps this bob from widening the face at its fullest point, while an off-center part interrupts symmetry in a flattering way. The one-length edge gathers every fine strand into a substantial line, making the hair look healthier and thicker. It has a sophisticated, unfussy mood and grows out more gracefully than a sharply stacked bob. Ask for a blunt bob two inches below the chin with zero graduation, minimal face framing and a natural off-center part; smooth only the front pieces and let a slight bend remain through the ends.
Ask your stylist for: Ask for a blunt bob two inches below the chin, zero graduation and minimal framing.
4. Shoulder Cut With Invisible Crown Lift
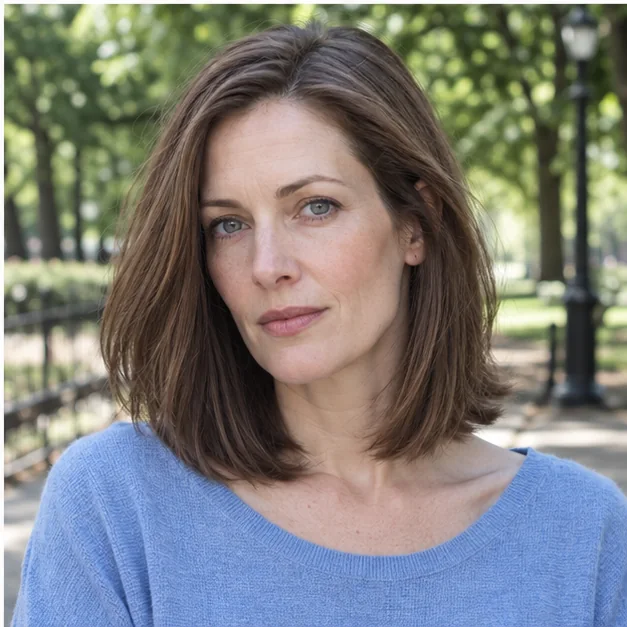
This shoulder cut looks nearly one length outside, but a few invisible internal layers remove weight at the crown so the roots can lift. The lower edge stays full, preserving density, while the subtle height creates a longer visual line above rounded cheeks. It is an elegant middle ground for anyone wary of obvious layers and feels reassuringly natural. Ask for a solid shoulder baseline, hidden low-elevation crown layers and no thinning through the bottom three inches; rough-dry the crown upward for two minutes, then leave the lengths smooth or softly bent.
Ask your stylist for: Request a solid shoulder baseline with hidden crown layers and no thinning through the bottom three inches.
Pause and notice: Thin hair often looks strongest when most strands meet at one perimeter. Use layers only where they lift a root, redirect a front section or help texture group.
5. Textured Bixie With a Diagonal Fringe
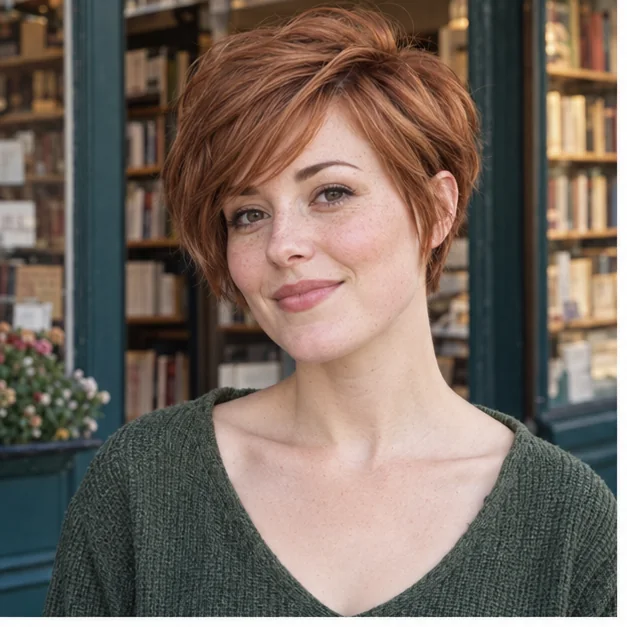
A bixie combines pixie lift with bob-like length around the ears, creating a narrow outline instead of a round cap. The diagonal fringe crosses the forehead and directs attention toward the eyes, while the fuller top gives thin hair a buoyant appearance. This version feels playful and self-assured without demanding a full blowout. Ask for ear-length sides, a softly tapered nape, connected crown layers and a substantial diagonal fringe; pinch dry texture cream into only a few pieces so the hair stays airy rather than separating into wisps.
Ask your stylist for: Ask for ear-length sides, a tapered nape, connected crown layers and a substantial diagonal fringe.
6. Long U-Shaped Cut With Cheekbone Swoops
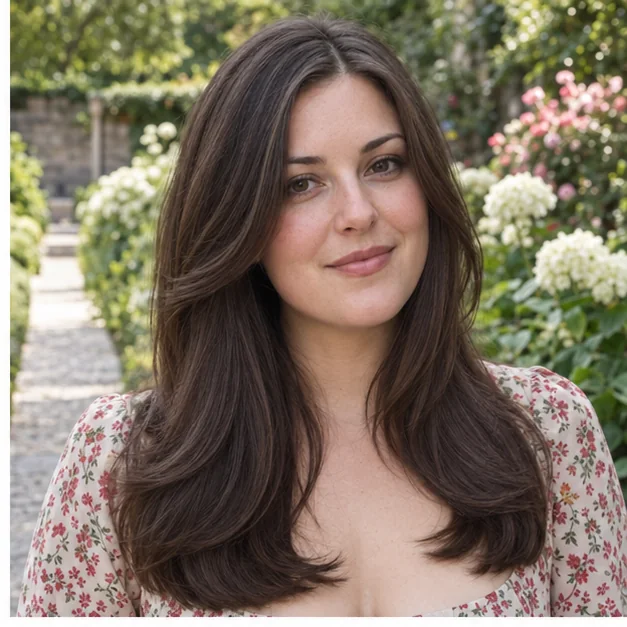
A gentle U perimeter keeps long hair looking generous at the back, while two long swooping pieces open near the cheekbones and travel past the jaw. Those curves introduce vertical movement without carving thin lengths into many visible layers. The style feels romantic and composed, and it preserves weight for braids, clips and ponytails. Ask for a shallow U perimeter, no layers above the shoulders and long framing that begins at the cheekbone but keeps its bulk below the jaw; set the front in two large rollers while roots cool, then brush once.
Ask your stylist for: Request a shallow U perimeter, no layers above the shoulders and substantial cheekbone-to-jaw framing.
7. Wavy Lob With Lifted Roots and Full Ends

Soft bends begin below the cheekbones on this lob, keeping volume away from the widest part of a round face while roots rise gently at the crown. A blunt collarbone edge gives naturally wavy fine hair a fuller finish and stops movement from turning stringy. The look reads relaxed, fresh and quietly glamorous even when air-dried. Ask for a collarbone lob with a blunt perimeter, only long surface movement and no short cheek-level layers; apply mousse at the roots, scrunch foam through the midlengths and diffuse upside down for a few minutes.
Ask your stylist for: Ask for a blunt collarbone lob with long surface movement and no short cheek-level layers.
8. Rounded Curly Bob With a Higher Crown

A curly bob flatters a round face when its widest point sits above the cheeks and the crown carries extra height. The perimeter remains rounded but narrows toward the jaw, helping fine curls cluster into substantial shapes instead of fuzzy ends. The result feels joyful, soft and confidently natural. Ask for curl-by-curl shaping with crown length preserved, side volume concentrated near the temples and a perimeter below the jaw when dry; use light gel over soaking-wet curls, diffuse at the roots and avoid breaking every cast into separate strands.
Ask your stylist for: Request curl-by-curl shaping with preserved crown length, temple-level width and a below-jaw dry perimeter.
Before You Book the Appointment
A successful salon visit begins with the overall shape, construction and upkeep—not only the finished length. Use this quick reality check before choosing your final reference photograph.
- Best for: Fine or low-density hair with softly curved or full-cheeked proportions.
- Choose by: Natural texture, scalp visibility, cowlicks and styling tolerance.
- Everyday effort: Most looks need three to ten minutes of root lift or directional drying.
- Salon rule: Protect the baseline first, then place only layers that create lift or direction.
What Makes These Styles Work?
A useful cut combines a substantial baseline with controlled height, asymmetry or vertical framing. The right proportions depend on where the face is widest, how the hair parts and whether the ends or crown need support.
What to Ask for at the Salon
Say that your priorities are a full-looking perimeter and height or diagonal movement. Ask where the shortest layer will land, whether thinning shears are planned and how much density will remain through the bottom two inches.
Styling, Maintenance and Grow-Out
Use mousse, foam or light root spray before heavy oils. Dry roots opposite their final direction and touch the ends minimally. Preserve the baseline during grow-out and let framing reconnect before adding layers.