Feed-in braids have a beautifully seamless quality: each braid begins slim near the scalp and grows fuller as small pieces of extension hair are added along the way. That gradual construction distinguishes them from traditional cornrows started with one fixed bundle, while their attached scalp pattern separates them from free-hanging box braids. The technique can create straight backs, curves, ponytails, buns and intricate freestyle maps without a bulky knot at the root. Ahead are genuinely different ways to wear the look, plus clear language for choosing braid count, size, tension and finish with your stylist.
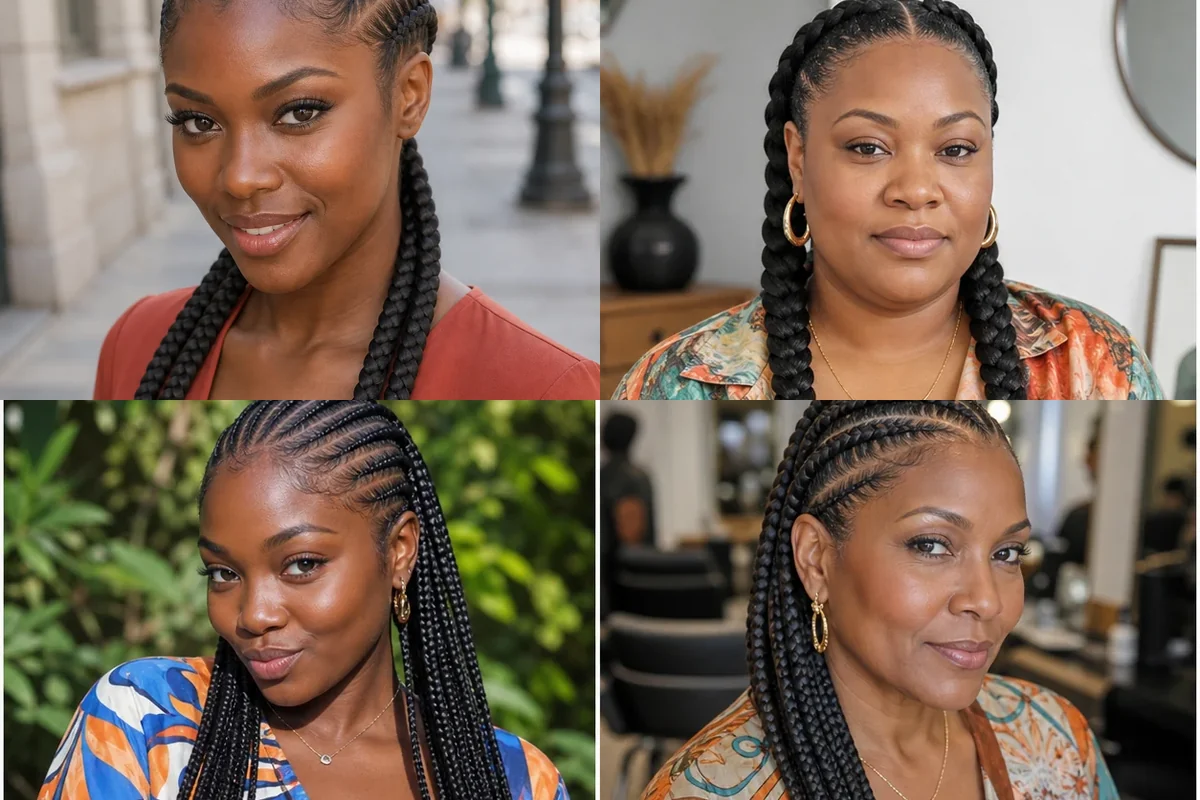
Find the one that feels like you: Start with the first look and let the photographs lead. Each style explains how the shape affects your features, the mood it creates and the exact words to take to your stylist.
1. Classic Six Straight-Back Feed-In Braids
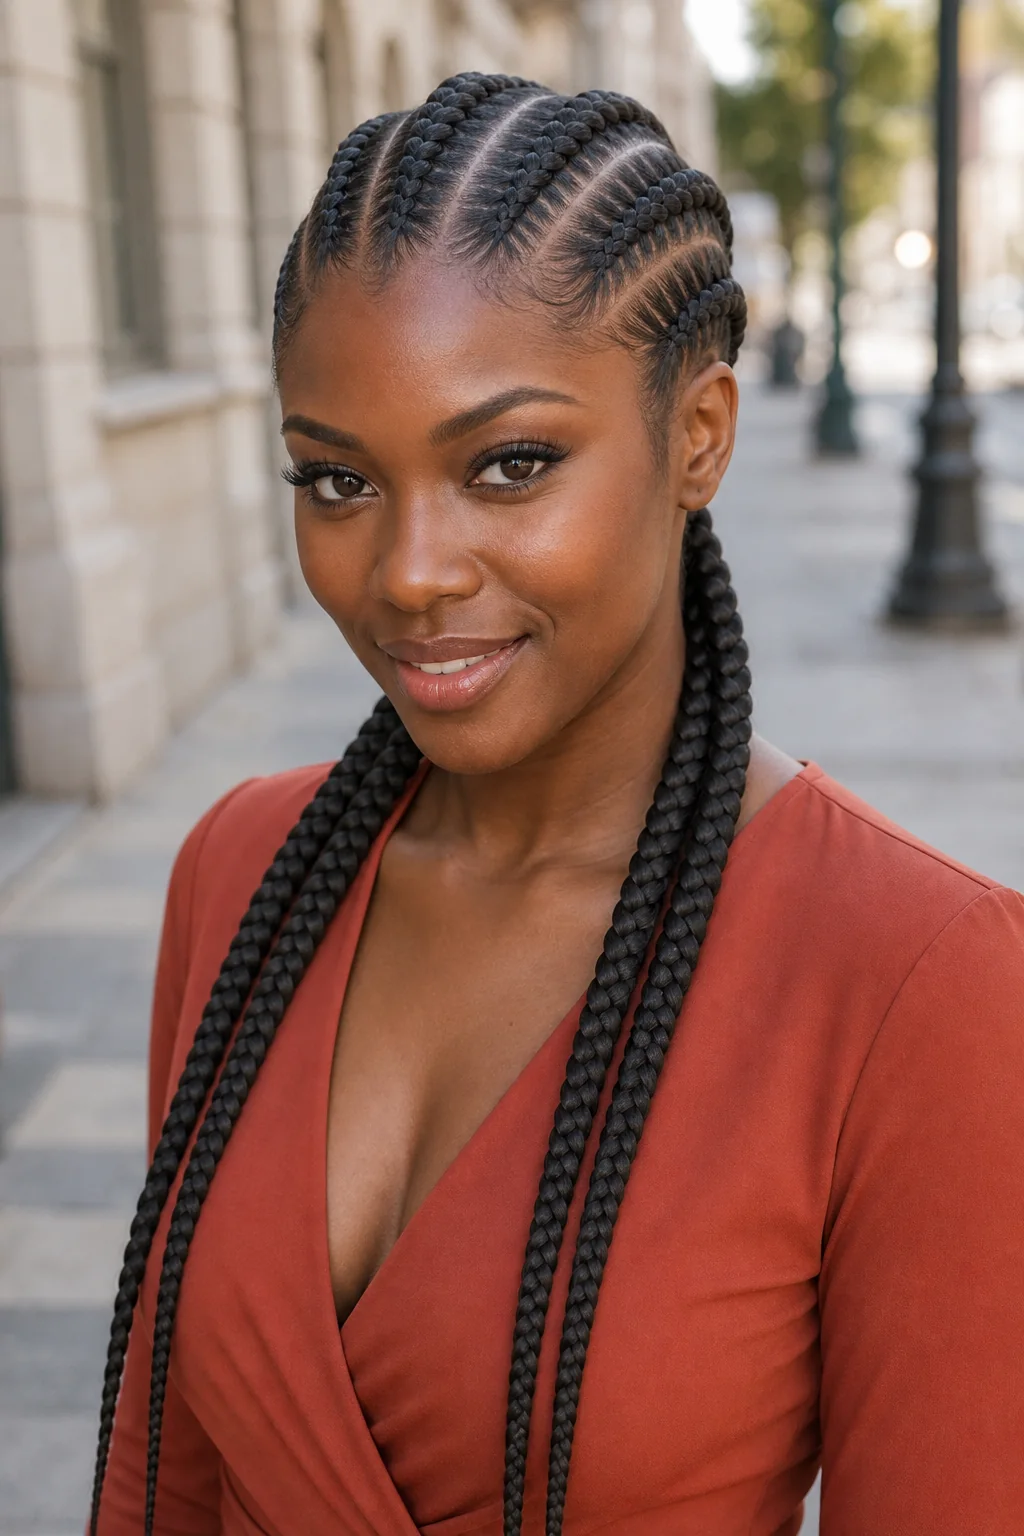
Six medium braids travel in crisp parallel lines from the forehead to long tapered ends, showing the feed-in technique at its sleekest. The balanced count keeps the pattern visible, visually lengthens a round face and can make you feel instantly polished for work, travel or workouts. Because every row is exposed, uneven parting and buildup show quickly. Ask for six evenly spaced straight backs, gradual extension additions, soft edge tension and flexible tapered ends.
Ask your stylist for: Six evenly spaced straight backs with gradual feed-in, comfortable edges and flexible tapered ends.
2. Two Jumbo Feed-In Braids
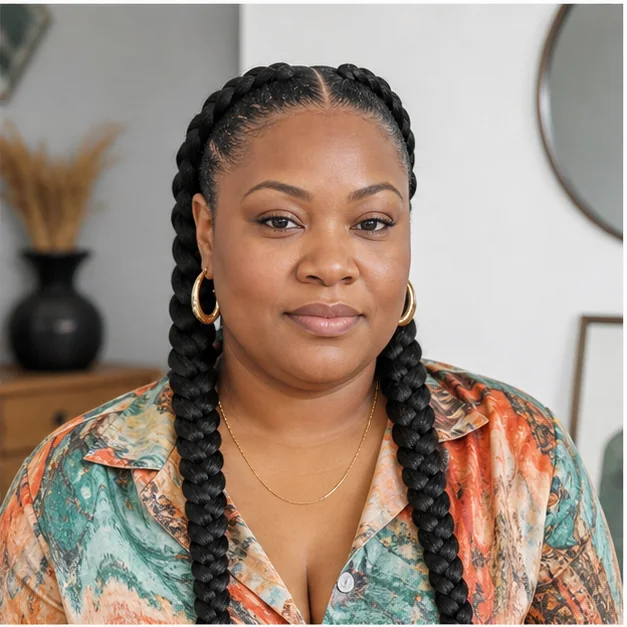
Two substantial braids begin beside a precise center part and widen gradually into long sculptural plaits. The strong symmetry highlights the eyes, opens the face and feels confident and sporty while remaining easy to wrap at night. Large should not mean tight; too much extension near the hairline can make this simple set uncomfortable. Request generous natural-hair sections, small increments of lightweight hair, unforced edges and tails long enough to balance the scale.
Ask your stylist for: Two jumbo center-part braids with generous sections, lightweight feed-in and no forced edge grip.
3. Eight Slim Straight-Back Braids
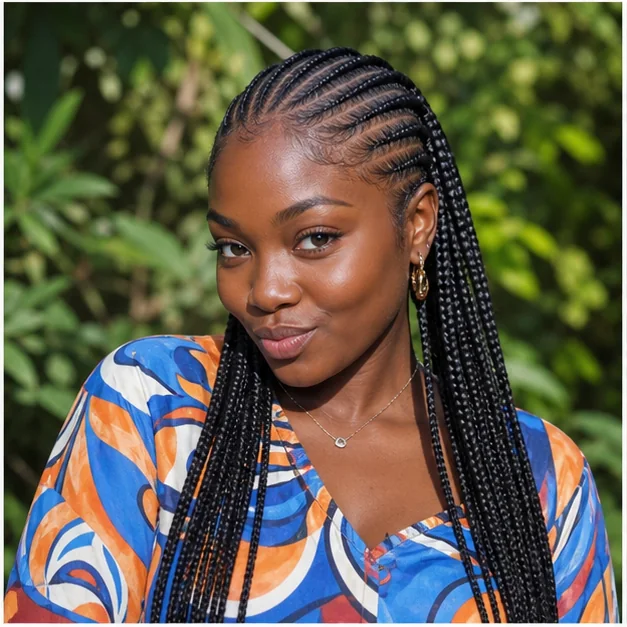
Eight slim braids form a finer striped pattern than the classic six, staying close to the scalp before falling past the shoulders. The extra lines softly frame a smaller forehead, suit an active routine and feel precise without the commitment of dozens of tiny cornrows. Narrow sections require care because excess grip can stress fine perimeter hair. Ask for eight uniform rows, slightly larger temple sections, modest extension amounts and parting that follows your head shape.
Ask your stylist for: Eight slim rows with protected temples, modest extension and head-contoured parting.
4. Four Curved Feed-In Braids
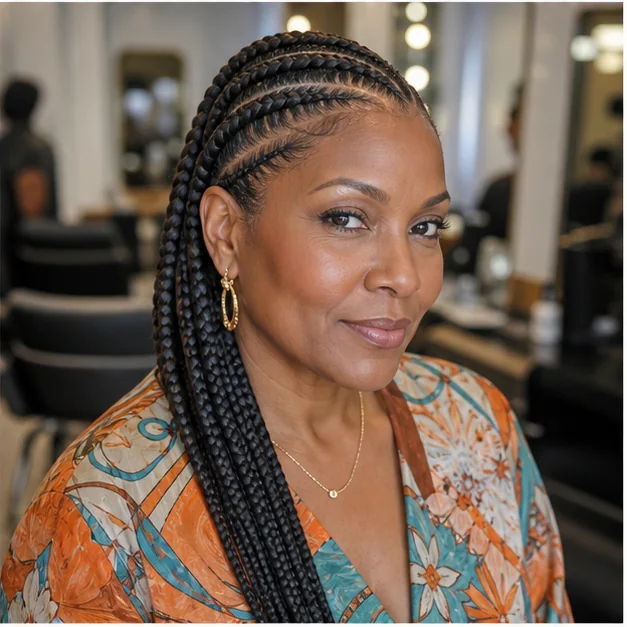
Four medium braids arc from an off-center starting point before sweeping toward the nape, replacing rigid lines with graceful movement. The curves soften angular features, create diagonal lift and feel elegant while keeping the installation uncomplicated. A simple design depends on beautifully planned spacing; crowded curves can look accidental. Ask for four mirrored sweeping rows, narrow clean negative space, gradual thickness and a direction that complements your preferred side part.
Ask your stylist for: Four mirrored curved rows with balanced spacing and a flattering off-center direction.
5. Small Feed-In Braids to the Back
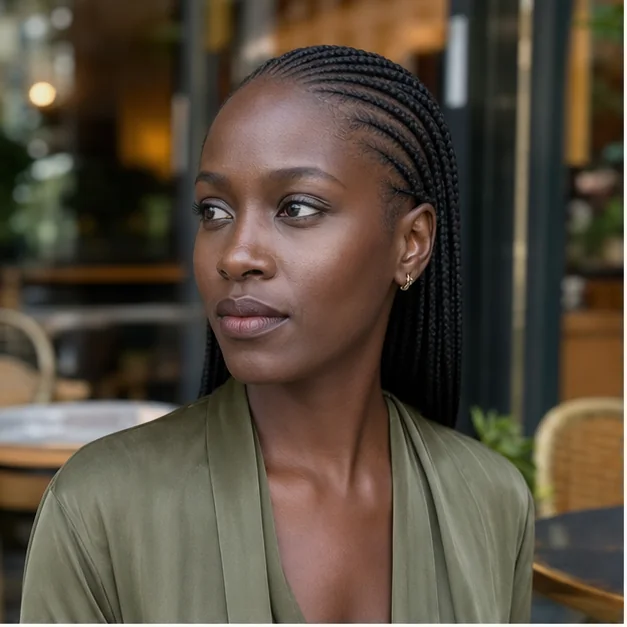
Many small feed-in braids run straight back in organized rows, creating intricate texture without the loose sections of box braids. The narrow scale lies flat beneath scarves, keeps hair away from the face and feels refined and completely put together. Installation takes longer, while tiny sections become risky when loaded with too much extension hair. Request small rather than micro rows, larger hairline sections, a conservative finished length and enough scalp spacing for cleansing and complete drying.
Ask your stylist for: Small non-micro straight backs with larger perimeter sections and clear scalp access.
6. Large Feed-In Braids With Clean Parts
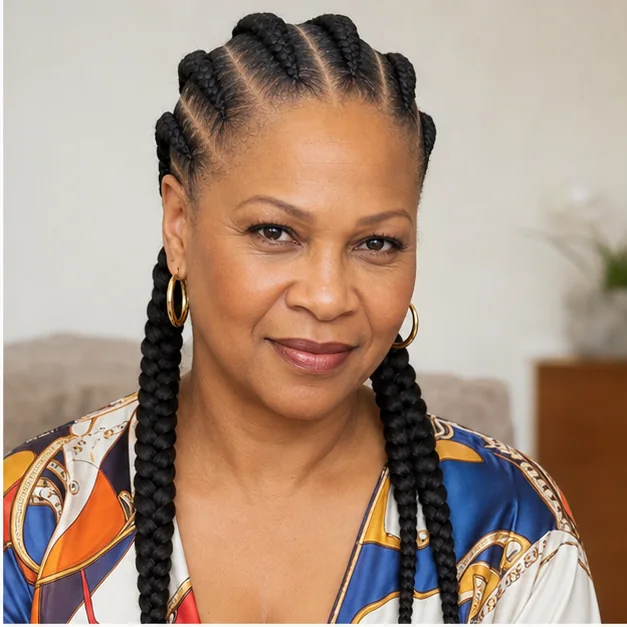
Five broad braids sit between wide immaculate part lines, allowing the exposed scalp map to become part of the design. The openness makes a strong style feel airy, draws attention to the cheekbones and creates bold modern confidence with fewer braids to manage. Large rows may loosen sooner on short or silky textures, and heavy tails can pull at the base. Ask for density-matched sections, controlled extension weight, non-flaking hold and tails proportionate to your natural hair strength.
Ask your stylist for: Five broad density-matched rows with crisp parts, controlled weight and non-flaking hold.
Pause and notice: Braid count changes more than the look. Fewer large rows can reduce chair time, while smaller rows create detail but demand careful section sizing.
7. Side-Part Feed-In Braids
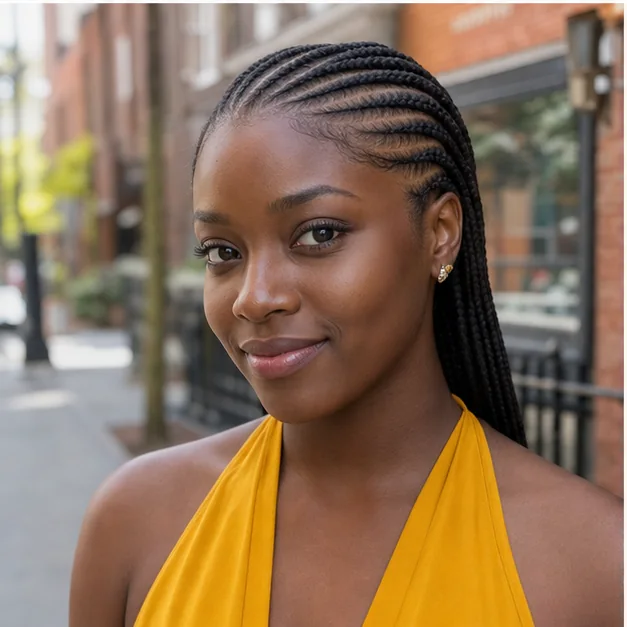
A deep side part sends slim braids diagonally across the crown before they settle toward the back. The asymmetry creates lift over one brow, visually lengthens a round face and feels glamorous without adding color or accessories. Directing heavy braids across one temple may strain that side, so root flexibility matters. Ask for an angled part placed to suit your features, lightweight front rows, wider edge sections and enough movement to switch the tails behind either shoulder.
Ask your stylist for: A flattering deep side part with lightweight front rows, protected edges and movable tails.
8. Center-Part Feed-In Braids
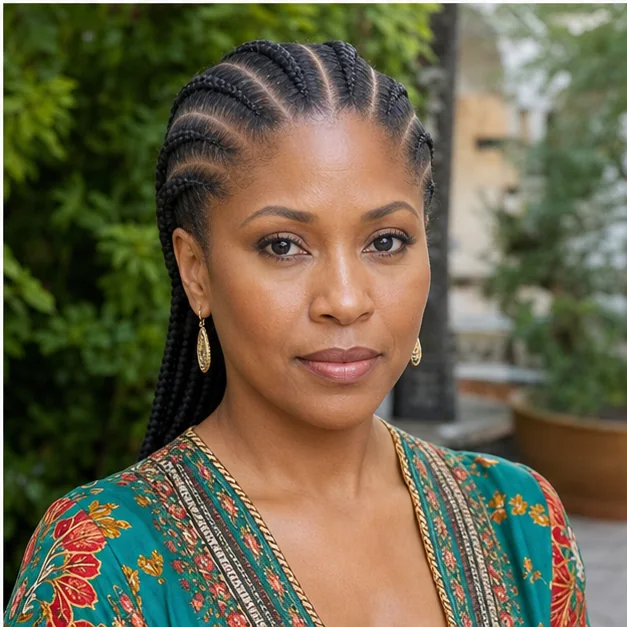
A narrow center part anchors mirrored feed-in rows that angle away from the face and meet at the back. The symmetry highlights the eyes, balances a heart-shaped face and creates a composed, sophisticated finish that works with almost any neckline. A part that is too wide can expose sparse areas or make coverage feel thin. Request a narrow central line, brick-laid rows behind it, equal density on both sides and two lighter braids at the temples.
Ask your stylist for: A narrow center part with mirrored rows, balanced density and light temple braids.
9. Freestyle Swirl Feed-In Braids
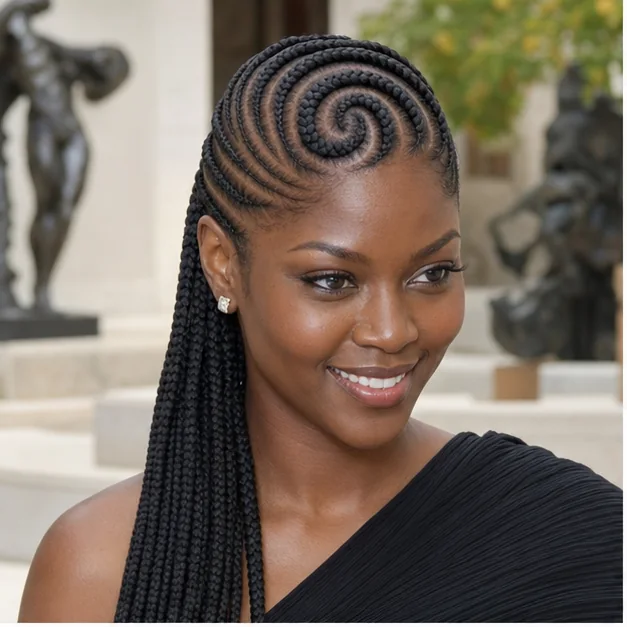
Curved feed-in braids spiral around the crown in an intentional map, with slim accent rows threading between larger arcs. The movement looks interesting from every angle, softens a long face with lateral curves and gives the wearer an artistic, individual feeling. Complex designs cannot be copied exactly on every head shape, so a reference should guide rather than dictate. Ask your braider to adapt one focal swirl, preserve comfortable section sizes and photograph the approved map before adding hair.
Ask your stylist for: One adapted focal swirl with slim accents, safe sections and an approved parting map.
10. Zigzag-Part Feed-In Braids
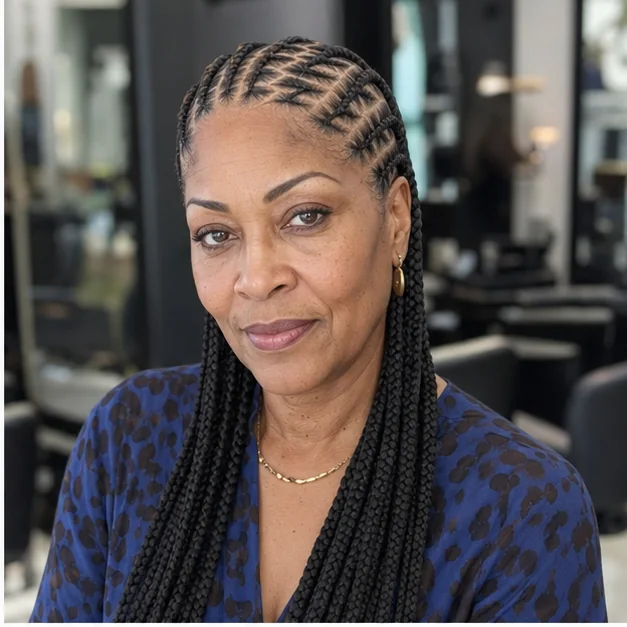
Medium feed-in braids follow straight paths while sharp zigzag parts create graphic rhythm across the scalp. The contrast keeps the silhouette practical but adds enough detail to feel playful and fashion-forward, especially when the tails remain one natural shade. Decorative corners can become tension points if sections are too narrow. Ask for broad clean zigzags with rounded section corners, braids that grow gradually and restrained product so the spaces stay crisp rather than lacquered.
Ask your stylist for: Broad zigzag parts with rounded corners, gradual braids and light non-flaking product.
11. Feed-In Braids High Ponytail
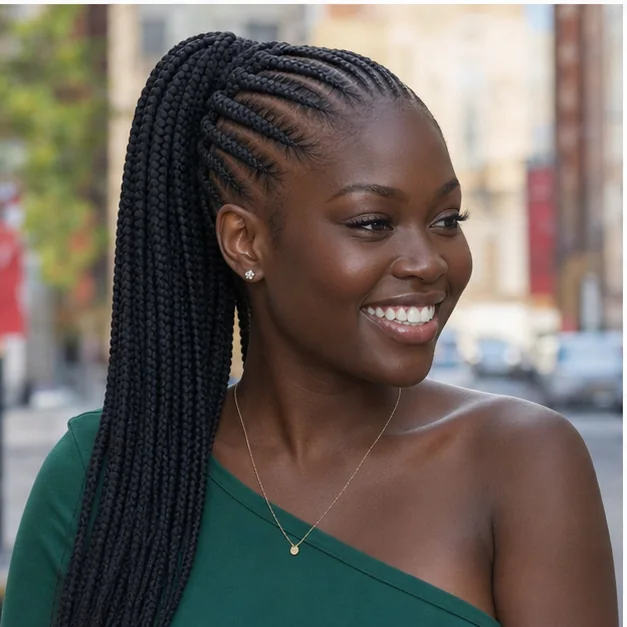
Feed-in rows travel upward from every direction and collect at the crown, where braided tails fall in a high ponytail. The lifted shape lengthens the neck, showcases cheekbones and feels energetic and glamorous without daily restyling. The base must not be cinched tighter after installation, and very long tails can become tiring. Request multidirectional rows designed for the final height, moderate extension length, protected nape sections and a ponytail base that feels secure without throbbing.
Ask your stylist for: Multidirectional crown rows, moderate tails, protected nape sections and a comfortable base.
12. Low-Bun Feed-In Braids
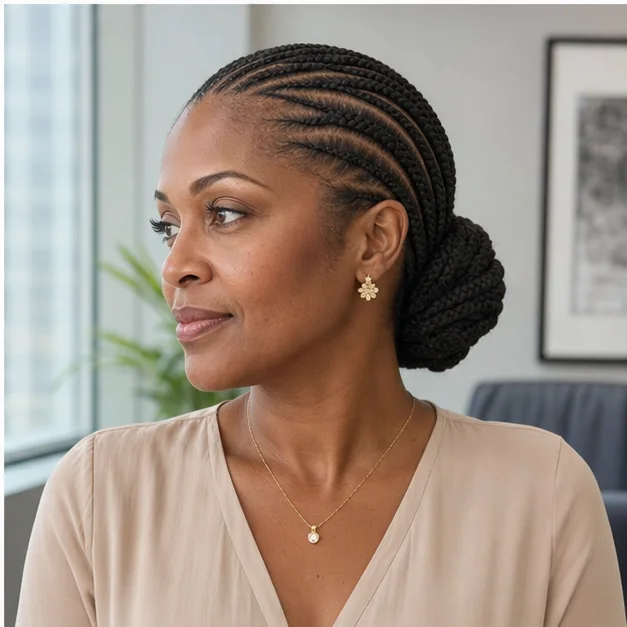
Sleek braids converge at the nape and wrap into a broad low bun, keeping every end contained in a polished silhouette. The placement looks graceful with professional clothing, balances a tall forehead and feels serenely organized all day. A tightly packed bun may create pressure or hold moisture after cleansing. Ask for nape-directed rows, moderate tail length, flexible ends and a softly pinned bun that can be loosened for sleep and left down until the scalp is dry.
Ask your stylist for: Nape-directed rows with flexible tails and a softly pinned, removable low bun.
13. Feed-In Braids Into a Crown Bun
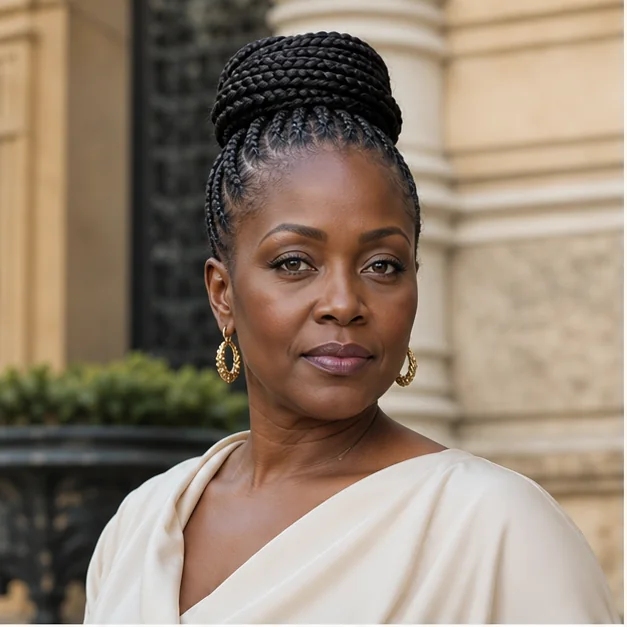
Rows sweep upward into a compact bun just behind the crown, creating a statuesque shape with no loose tails. The height elongates a round face, displays earrings and feels sophisticated for an event while remaining practical afterward. Concentrating extension hair at one point increases weight, so the bun should be intentionally light. Request medium upward rows, fewer extension packs than a loose ponytail, a broad supported base and a bun secured without sharp pins against the scalp.
Ask your stylist for: Medium upward rows, restrained weight, a broad base and no scalp-scraping pins.
14. Half-Up Feed-In Braids With Loose Lengths
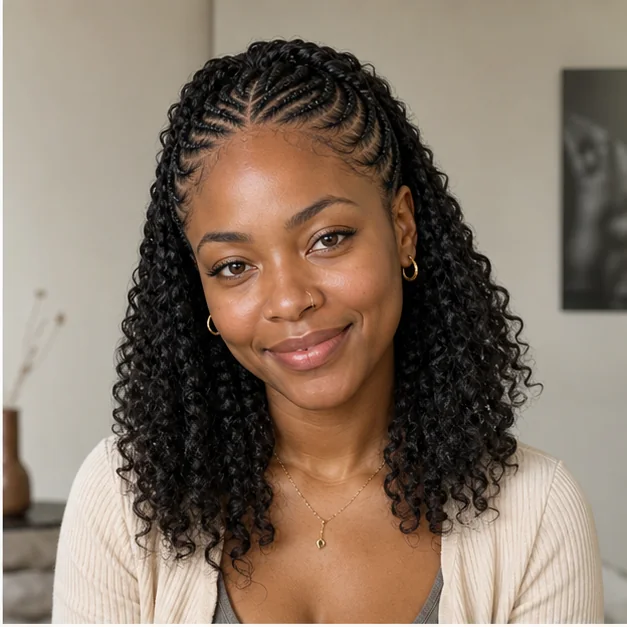
Slim feed-in braids sweep through the top and sides, then blend into loose textured lengths below the crown. The combination opens the face, adds gentle height and feels romantic rather than fully slicked back. The loose hair needs a clear installation plan—sew-in, crochet or natural leave-out—because mismatched texture and tension undermine the finish. Ask for lightweight crown rows, an honest explanation of the method, minimal leave-out and a texture that can be maintained without excessive heat.
Ask your stylist for: Lightweight crown feed-ins with minimal leave-out and a clearly agreed low-heat method.
Pause and notice: Choose an updo direction before braiding begins so roots follow the shape naturally instead of being pulled into position afterward.
15. Boho Feed-In Braids With Curly Ends
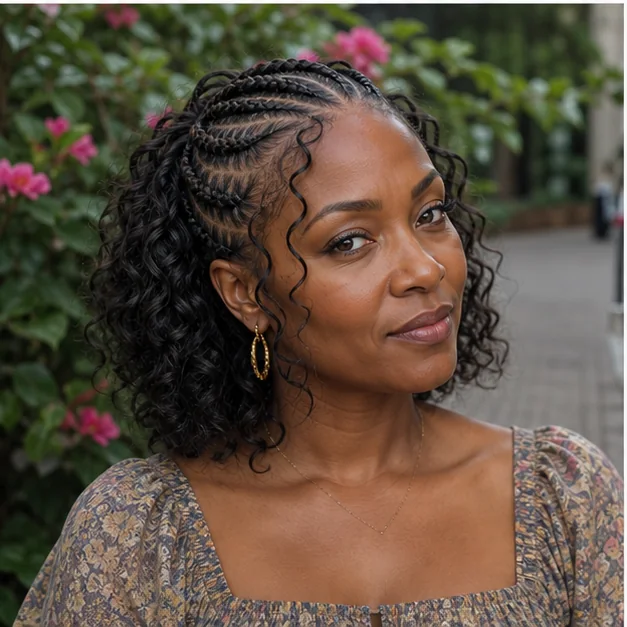
Neat braids remain defined through the scalp and upper lengths before releasing into scattered soft curls near the shoulders. The contrast takes visual weight away from the ends, softens angular features and feels playful and beautifully dressed up. Loose curl hair tangles faster than sealed ends, especially at the nape and on collars. Request curls concentrated away from high-friction rows, a compatible extension blend, restrained leave-out and a simple care plan using mousse and gentle finger separation.
Ask your stylist for: Defined feed-ins with restrained curls, reduced nape leave-out and a compatible blend.
16. Feed-In Goddess Braids
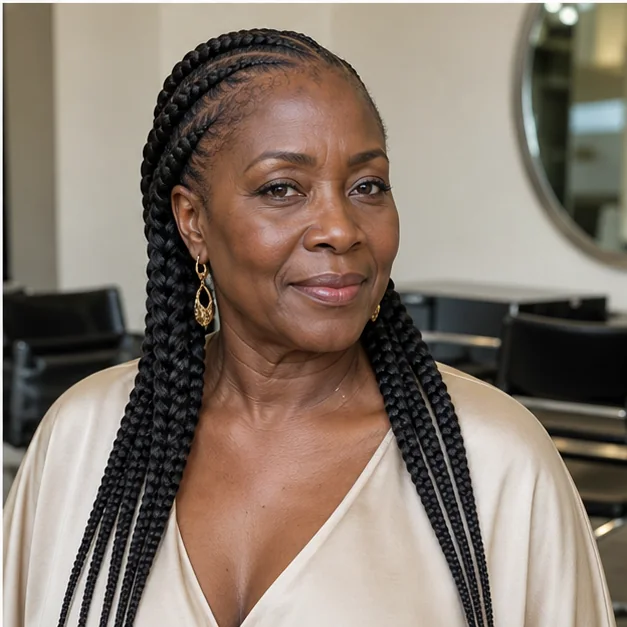
Large feed-in goddess braids curve around the head in a small number of smooth substantial rows with tapered tails. Their scale creates a regal silhouette, frames strong cheekbones and feels commanding without the time commitment of many tiny braids. Thick rows become heavy quickly when the extension bundle is not matched to the natural section. Ask for four to six curved rows, generous parts, gradual additions, lightweight tails and softly finished edges rather than an unnaturally tight hairline.
Ask your stylist for: Four to six curved goddess rows with generous parts, light tails and soft edges.
17. Burgundy Feed-In Braids
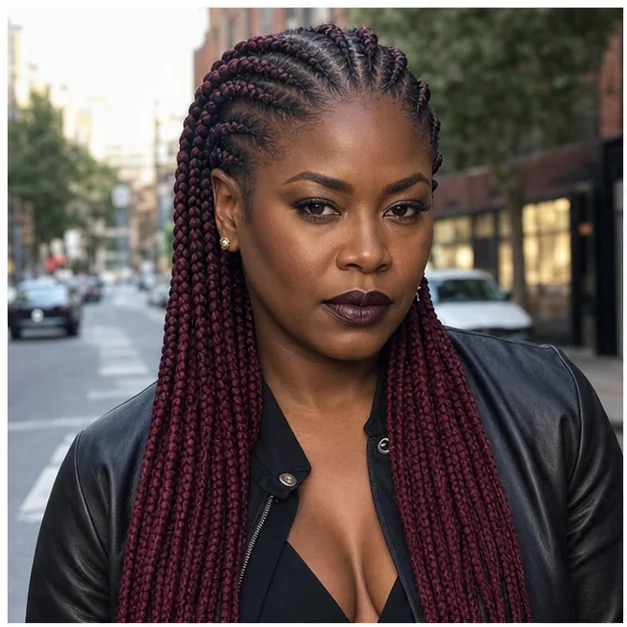
Deep wine extension hair enters gradually after a natural dark root, giving the braids dimensional burgundy rather than an abrupt block of red. The shade warms the complexion, photographs beautifully and feels expressive while remaining sophisticated indoors. Red fibers vary in undertone and may transfer color when wet, so testing matters. Ask to compare an opened sample in daylight, keep the first additions close to your root shade and use tested deep burgundy through the middle and tails.
Ask your stylist for: Natural dark starts melting into tested deep burgundy through the middle and tails.
18. Honey-Blonde Feed-In Braids
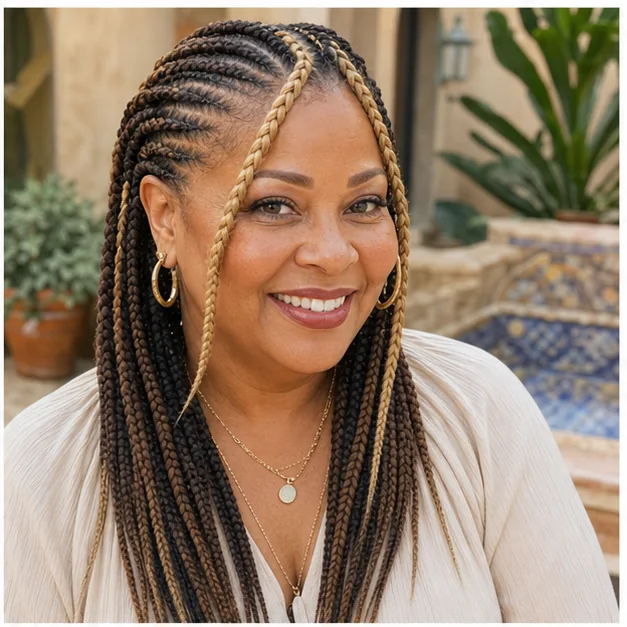
Honey and caramel pieces appear in selected rows while most braids remain deep brown, creating light around the face without flattening the pattern. Strategic brightness illuminates warm undertones, adds dimension in photographs and feels sunny and adventurous. An even alternating scheme may look stripy, and pale fibers expose fuzz sooner. Request a dark-rooted base, irregular honey placement, two softly brightened face-framing rows and compatible warm shades blended before the appointment.
Ask your stylist for: A dark base with irregular honey accents and two brightened face-framing rows.
19. Feed-In Braids With Beads
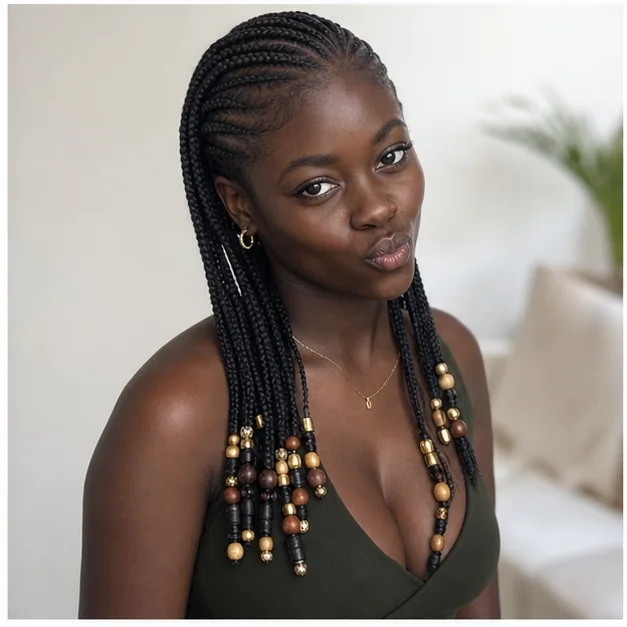
Lightweight wooden and metallic beads punctuate selected ends, leaving the scalp pattern clean and most tails undecorated. The accents draw the eye through the length, add personal rhythm and feel creative without overwhelming a refined installation. Too much hardware creates noise, friction and unnecessary weight on small braids. Ask for beads only on sturdy central rows, an asymmetrical arrangement, secure non-sharp stoppers and no ornaments on the finest temple or nape sections.
Ask your stylist for: Lightweight beads scattered on sturdy central braids, away from the perimeter.
20. Layered Feed-In Braids
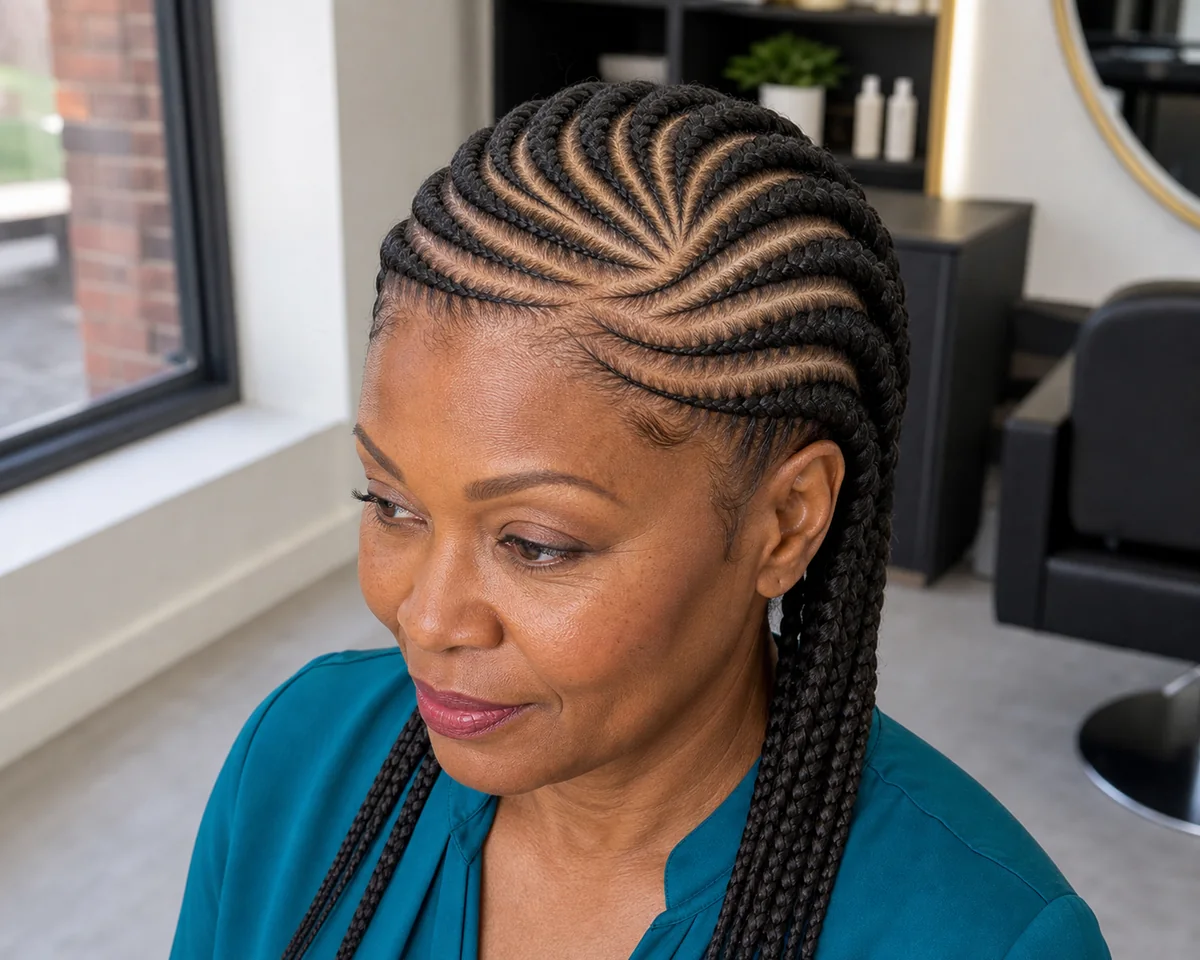
Two tiers overlap visually: slim upper rows curve between larger lower braids before all tails settle at the back. The map creates depth, makes the crown appear fuller and feels inventive without requiring extreme length. Crowded tiers can trap buildup and make drying difficult if spacing is too tight. Ask for a clearly separated two-layer plan, breathable negative space, larger foundation rows, lightweight accent braids and enough access to cleanse every exposed channel.
Ask your stylist for: A breathable two-layer map with larger foundations, light accents and accessible channels.
Pause and notice: Persistent soreness, bumps, headaches or a strained hairline are reasons to loosen or remove the style—not signs that it will simply settle.
Before You Book the Appointment
A successful salon visit begins with the overall shape, construction and upkeep—not only the finished length. Use this quick reality check before choosing your final reference photograph.
- Best for: Natural and transitioning textures with enough length for a secure cornrow base; fragile edges need fewer, lighter rows.
- Signature finish: Scalp-following braids that start slim and thicken as extension hair is added gradually.
- Closest alternatives: Traditional cornrows may start with a fixed bundle; stitch braids emphasize stitch marks; box braids hang from individual sections.
- Maintenance: Clean exposed channels gently, dry roots completely, protect tails with satin and remove the style if tension or buildup persists.
What Feed-In Braids Are—and What Makes Them Different
Feed-in braids are attached braids, usually cornrows, built by adding small pieces of extension hair as the braid progresses. That creates a slim natural-looking start instead of a bulky knot. Stitch braids can use this method, but their defining feature is the visible horizontal stitch pattern. Knotless box braids also add hair gradually, yet each braid hangs from an individual part rather than traveling along the scalp. Bring a photo because salon labels overlap.
Choosing Braid Count, Size and Pattern
Two or four braids make a bold statement; six or eight create balanced detail; many small rows produce the finest pattern and longest chair time. Match each extension bundle to the strength of natural hair in its section. Straight backs feel athletic, curved rows soften the profile, and freestyle maps need excellent parting skills. Decide whether tails will hang loose, gather into a ponytail or form a bun before installation so roots follow the intended direction.
How to Ask for Feed-In Braids at the Salon
State the exact braid count, thickness, direction, finished length, parting design and color placement. Show front, side and back references. Ask for gradual additions, larger hairline and nape sections, no painful grip and a finished weight you can lift comfortably. Explain if you wear glasses, helmets or workout headbands so rows avoid pressure points. Agree on edge styling and product level; a smooth result does not require hard gel or forced baby hairs.
Scalp Care and Realistic Longevity
Clean exposed channels with diluted shampoo or a targeted applicator, rinse carefully and dry every root before covering the style. Use a satin scarf over the scalp and a loose bonnet for long tails. Longevity varies with braid size, hair growth, workouts and product use. Remove the style when the base becomes painful, difficult to clean, badly matted or visibly stressful at the perimeter rather than chasing a fixed number of weeks.
Safe Take-Down and Time Between Installs
Remove beads first, then confirm where natural hair ends before cutting any extension tail. Unbraid from the bottom, separate shed hair with conditioner and detangle each section before shampooing. Shed hair can look dramatic after weeks without combing, but broken short pieces, thinning edges or tenderness deserve a longer break. Cleanse thoroughly, restore moisture and let the scalp rest without added weight before repeating the same direction or detailed pattern.
More Hair Inspiration
- 20 Box Braids Hairstyles That Feel Polished, Versatile and Beautiful — Compare free-hanging box sections with scalp-following feed-ins.
- 20 Fulani Braids With Beautiful Patterns, Curls and Beads — Explore a culturally specific layout that can use feed-in technique.
- 20 Boho Braids That Look Soft, Romantic and Beautiful — See loose-curl braid ideas for a softer finish.